Setting up Favicons for Jekyll's Theme Chirpy
Setting up Favicons for Jekyll’s Theme Chirpy
Introduction
Where to store favicons?
Currently I’m still customizing this blog and a couple of weeks ago I wanted to set up a customized favicon.
Whenever I ran the site locally, I noticed a warning on terminal saying that Jekyll couldn’t find any .ico files under assets/img/favicons/ so I thought this would be as simple as uploading an image with an .ico format on that path. This approach was wrong though.
According to that terminal warning, the path where I stored the favicon was correct. Maybe the problem was the icon I chose, or the image’s format? I decided to take a look at the site’s HTML code to narrow down the possibilities.
The information about favicons is normally placed whithin the <head> tags:
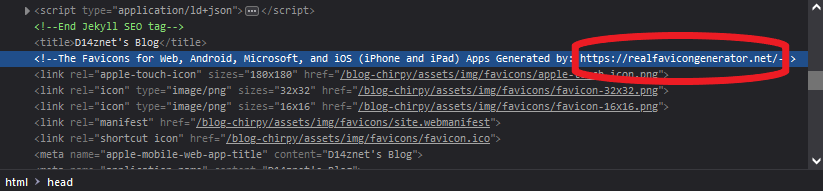
There it was! The code mentioned that favicons were generated by Real Favicon Generator. So the problem was on the way I was generating the favicon - simply pasting an image into the requested path wasn’t doing the trick.
How to generate favicons?
I’m sure there are many favicon generators but I stuck to the one mentioned on Chirpy’s HTML code. As mentioned before, simply pasting an image into the assets/img/favicons/ wasn’t working, because every platform has its own requirements about how the favicons should be named and how they should look like. Basically, your favicon would look differently if you load your site on a computer browser or if you browse using your smartphone.
Your site needs to have alternatives for each different platform (no single favicon to run them all) and as I’m not much of a graphic designer myself, I let the generator do the job.
Once I had all the files, I pasted them into the path, ran the site locally on my machine and voilà - my favicons were there!
TL;DR - How to set up favicons for your Jekyll blog running Chirpy Theme
These instructions are meant for Real Favicon Generator. Steps may vary using other generators.
Generate favicons
- Choose an icon or an image an upload it to the generator - use 260x260 for optimal results.
- If your image is tinier than recommended, Favicon Generator will display a warning - if the size is still OK, you will be able to continue.
- Generator will create a preview of the favicon for all plaforms. On this step, you can tweak the icons and add a margin, change background color, etc. Continue with Generate your Favicons and HTML code.
Download and install favicons
Real Favicon Generator offers support for different platforms - HTML5, JSNode, Rails… I stuck to HTML5 though, as I assumed this wouldn’t cause any compatibility problem with the rest of the site.
- Download the favicons and unpack all contents of the file into
assets/img/favicon- also the.webmanifestfile! - Real Favicon Generator also creates the corresponding HTML code to insert into the
<head>tag. Chirpy Theme already included these, so I could skip that part.
On your local machine, run bundle exec jekyll serve and take a look at http://localhost:4000/ to see your favicon deployed. Remember to browse the site using a private session or incognito mode so that your browser loads the latest version of the site instead of a cached one.